Wednesday, July 29, 2015

How to customize your dolls- part three

Hi guys! Welcome back to part three of how to customize your dolls! Today I am going to show you how to customize your dolls eyes! Its not that hard honestly, unless you completely erase the eye with nail polish remover.  So today I am just showing you how to refine the lashes and put eyeliner.

So here is the side that I refined the lashes and gave her eyeliner. It looks pretty good if I do say so myself lol. If you want to totally remove all the paint on the eye, go for it, but look up some ideas so you know what your dealing with.
The other side :D
Take a fine point sharpie/permanent marker, fine point works best :)
Just go over each eyelash multiple times, trying not to get it on the eye. Very simple really.
Then go around the eye with the marker, for eyeliner.
I hope you liked this part of the tutorial, sorry it was so short. Next post will hopefully be longer :D
I hope you all have a great night and I hope I see you tomorrow :D.
~Halo


Friday, July 24, 2015

How to customize your dolls part 2

Hello everyone! Today I am back with part two of how to customize your dolls! In this part I will be showing your how to easily add a different color to your dolls lips. Either its just a touch up or a total color change; your dolls will look amazing with this pop of color!

(Sorry for the slightly blurry pic) Here is Mattie once again, ready for some more makeovers! She cant wait for this tutorial!
All you need is a marker............................................................................................................
And to start off, I would recommend a washable one, so if you mess up on the first try you can just wash it off :)
Ok we are at the start of adding color to the lips, but first you should choose your color scheme. I am using the basic colors; pink and red.
(sorry its on my knee, lol like my pants?) What you do is simply layer on the marker until you get the color that you want.
You should end up with something like this, if you want to leave it removable then you are finished with this tutorial, if you want it permanent then continue this tutorial :D
If you like the color and you think you want it to be permanent, try to find a color that matches your washable marker.
If this is your first custom, you might get shaky and get afraid to use permanent marker on your dolls face. But don't let your nerves get to you, if you are shaky and try to do this, you might end up with a red line across your dolls face (sorry if that scares you o.o). So if you are worried about something bad happening, take a break and come back to it. Or just leave it removable.  So when you calm down just follow the previous steps to add the permanent marker, and you should end up with pretty shiny lips like this!

I hope you found this tutorial helpful, I was worried no one would use this part because most people might already know how to add marker to doll lips, and I am sorry if this was a waste of time. Tomorrow I hope the next part will be more helpful :D It will be about eyes!
If you missed any tutorials here is a list:
Part one- Freckles
Part two- Lips
Part three- Eyes
Part four- Hair
Part five- Clothes
Part six- Body markings and accessories
If you don't see something that on the list that you want to learn how to customize, please leave me a comment below and I will try to get to it!
Thanks and have a GREAT day!
~Halo~


Thursday, July 23, 2015

How to customize your dolls part one

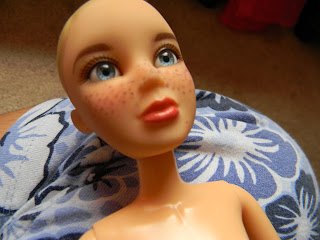
Hello everyone! I decided to create a series on how to customize your dolls! Today I am going to show you how to add removable freckles with washable markers, these freckles will make any doll pop!

Today, I have Mattie. As you can see she isn't in the best shape, and I am going to change that! She is a Spa Liv Doll, and I have had her for a long time. I thought it would be time to customize her! You can use any dolls with this tutorial so chose any doll you like! Lets get started!
 
You need to start off my disrobing your doll, you should do this with any customization so you don't get his or hers clothes dirty.
 
You also need to pull your dolls hair back, or if you have a Liv doll you can just pop the hair right out! Mattie: "OMG WHERE IS MEH HAIR!!"

Now, it is time for the fun part, ADDING THE FRECKLES!!! Ok as you guys can see I already did half of the face, and I will do the other half with you wonderful ladies!

All you need is a marker (color of your choice).

All you have to do is make tiny dots around the area where you want freckles, when you do freckles you have to be quick.

Before the ink dries bounce your finger over the spot where the dots are, this will give it more of a realistic look to the freckles.
Add more if you wish, and your done with part one of how to customize your dolls! Stick around for the photo shoot!


(btw I changed the wig lol) I hope you liked part one! I will be back tomorrow with part two of how to customize your dolls!
~Halo~


~What's your favorite part when you customize your dolls?~


Wednesday, July 22, 2015

A doll craft- Make Doll Sized Ice cream!

Hello ladies! I am back from my surprisingly short vacation and here today with a doll sized craft! I have had these small ice cream containers sitting in my room for almost a year, and I knew I would make my dolls some ice cream one day but I guess I was stalling. So today I thought it would be the PERFECT day because it is blistering hot outside to do anything.


Here are the supplies:
Facial cotton balls
Small ice cream container
Paint (optional)
Start of by stretching the cotton balls making sure they don't completely split in half like so.


Once you have all your cotton balls stretched out put them together in a ball. Now you should have a puffy ball of fluff lol.
 

(sorry for the blurry pic) Stuff the fluff (hehe it rhymes) inside the small ice cream container. If you have enough cotton balls it should go all the way up to the top of your container, but I don't have enough.
 
 
If you want to make different flavors (chocolate chip, strawberry, ext.) you can take some paint and drizzle, drop or pour to get the ice cream looking like you want.
 
 
I am making chocolate chip so I am dropping black paint all over my ice cream.
 
 Photos of the ice cream


Once its dry put the cap on, label it with a marker and let your dolls enjoy handmade ice cream :)
 
 
I hope you liked my tutorial! I wish to do many in the future! Have a great day everyone! Please comment and share my blog with your friends!
~Halo~
 
 
*What's your favorite flavor of ice cream?*


Sunday, July 19, 2015

I will be gone for a while.....

Yes its true, I am leaving the blogging community for a WHOLE week (might be more idk).  But don't worry I will be back; I am just going on vacation :D. So farewell, toodles, goodbye, see ya soon, and bye. I will miss you all *sniff sniff* (lol).
Goodbye and have a great day,
~Halo

Wednesday, July 15, 2015

Cute thrift shop finds with Frankie Stein!

Hi guys its Halo here with Frankie Stein! She was SOOOOO EXCITED when I got home form the thrift shop cause' I always find something! So Frankie wants to show YOU personally what I got! Take it away Frankie!
Hi ladies, I hope your having a great Wednesday! I am going to show you all the AWESOME things that Halo got this week at the thrift shop!
Would you like cream or sugar with that miss? Halo found this super cute doll sized tea set, she thinks it was for candle sticks ( I don't believe her)

(Birds eye view of the tea set )
This was her big deal and a whopping 25 cents! Wow I was really surprised!
She also found sparkly clothes pins for crafts and stuff like that.
Me modeling the wonderful clothespins!
IT WAS ONLY 10 CENTS OMG!!!!!
Ok I love these, they are plastic glasses! I think they where for scrapbooking but now Miss Frankie Stein will try them on!
TADA!!!!!!!! They are kinda big but I think they will do!
She also got a pair of small scissors for sewing.....
And a cute necklace!!!


Thanks for stopping by and checking out all the stuff I found (halo found). And I hope you have a great rest of your day!
~Halo


Friday, July 10, 2015

Call me crazy- I customize my dolls.

Yup, you heard it, I customize my dolls! And I did a customization just recently! And now that it is completed I want to show you! I have currently been customizing Olivia, and most of you haven't been seeing her recently because I've been customizing her (I already said that, stop repeating your self halo lol).  Well, I hope you enjoy the customizations I have been doing!
 Here is Olivia from a far distance with her new customizations. you cant really notice some stuff on her face but you can notice her bangs.  
 
 I gave her bangs.
 
 I cut her hair shorter
 

 I gave her removable freckles
 

 And I gave her pink and green highlights with a marker.
 
 Olivia loves her new look and cant wait to go outside and play!
 
 "Photo shoot time!!!" Olivia squeals.


I hope you like my customization I did on Olivia! Please don't post any nasty comments about my customizations I do I appreciate it.  If your thinking about customizing your dolls, I would love to help; I was thinking about making a tutorial series about customizing dolls! But, I wouldn't recommend using expensive dolls like American Girl Dolls, but you can use Barbie's, Our Generation dolls ext.
I hope you have a great day,
~Halo~